GPU computing
Videos
Videos of this topic may be available from one of our kickstart course playlists: 2025 summer, 2025 winter, 2024, 2023, 2022 Summer, 2022 February, 2021 Summer, 2021 February. Or see computing explained with HPC kitchen.
Abstract
Request a GPU with the Slurm option
--gpus=1.Select a certain type of GPU with e.g.
--gpus=h200:1.Select a GPU with certain amount of memory with e.g.
--gpus=1 --gres=min-vram:80g.Select a GPU with certain CUDA compute capability with e.g.
--gpus=1 --gres=min-cuda-cc:80.See the quick reference for available GPU names, memory capacities, and compute capabilities, and how to combine
--gresoptions.Monitor GPU performance with
seff JOBID.You can test out small jobs of 30 minutes or less in the
gpu-debug-partition (--partition=gpu-debug).To run a job on GPU node, you must request at least one GPU. Running CPU-only workloads on GPU nodes is not permitted.
If you aren’t fully sure of how to scale up, contact us Research Software Engineers early.
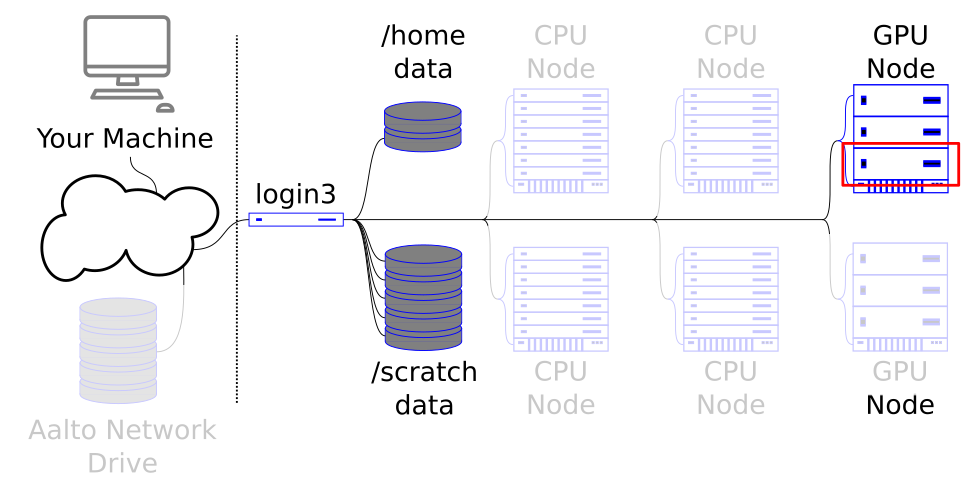
GPU nodes allow specialized types of work to be done massively in parallel.
What are GPUs and how do they parallelise calculations?
GPUs, short for graphical processing unit, are massively-parallel processors that are optimized to perform numerical calculations in parallel. Due to this specialisation GPUs can be substantially faster than CPUs when solving suitable problems.
GPUs are especially handy when dealing with matrices and vectors. This has allowed GPUs to become an indispensable tool in many research fields such as deep learning, where most of the calculations involve matrices.
The programs we normally write in common programming languages, e.g. C++ are executed by the CPU. To run a part of that program in a GPU the program must do the following:
Specify a piece of code called a kernel, which contains the GPU part of the program and is compiled for the specific GPU architecture in use.
Transfer the data needed by the program from the RAM to GPU VRAM.
Execute the kernel on the GPU.
Transfer the results from GPU VRAM to RAM.

To help with this procedure special APIs (application programming interfaces) have been created. An example of such an API is CUDA toolkit, which is the native programming interface for NVIDIA GPUs.
On Triton, we have a large number of NVIDIA GPU cards from different generations and a single machine with AMD GPU cards. Triton GPUs are not the typical desktop GPUs, but specialized research-grade server GPUs with large memory, high bandwidth and specialized instructions. For scientific purposes, they generally outperform the best desktop GPUs.
See also
Please ensure you have read Interactive jobs and Serial Jobs before you proceed with this tutorial.
Reserving a GPU
Slurm keeps track of the GPU resources as generic resources (GRES) or trackable resources (TRES). They are basically limited resources that you can request in addition to normal resources such as CPUs and RAM.
To request GPUs on Slurm, you should use the --gpus=N, where N
is the number of GPUs you wish to request.
For example, --gpus=1 will give you a single GPU.
Note
Most GPU programs cannot utilize more than one GPU at a time. Before trying to reserve multiple GPUs you should verify that your code can utilize them.
Moreover, running CPU-only jobs on GPU nodes is not permitted in our current setup. Thus, if you request a GPU partition in your job script, you must also request at least one GPU.
Choosing a specific type of GPU
In most cases you will want to choose a GPU that suits your specific use case.
You can use the syntax --gpus=GPU_TYPE:1 where GPU_TYPE is a name
chosen by the admins for the GPU.
For example, --gpus=h200:1 would give you a H200 card.
See the available GPUs reference for more information on available GPUs.
Choosing a GPU based on available VRAM
Different GPUs have different amounts of VRAM (video random access memory) available. If you’re running a program that requires some minimum amount of GPU VRAM memory (e.g. running an LLM AI model), you can choose only those GPUs that have enough memory.
To specify the amount of memory you require, use syntax
--gres=min-vram:NNg, where NN is the amount of VRAM needed.
As with any GPU request, you’ll need to specify the amount of GPUs you want
with --gpus=N as well.
For example, specifying --gpus=1 and --gres=min-vram:40g would give
you a single GPU with at least 40GB of memory.
See the available GPUs reference for more information on available GPUs.
Choosing a GPU based on CUDA compute capability
Different GPUs have different chip architectures that support different levels of CUDA compute capability. CUDA compute capability represents various different hardware features that the GPU chips are capable of implementing (bfloat16 support, lower precision floating point arithmetic etc.).
Sometimes codes and libraries require GPUs that support some minimum level of CUDA compute capability. In these cases you’ll want to choose GPUs based on their compute capability.
To specify the minimum compute capability, use syntax --gres=min-cuda-cc:CC,
where CC is the compute capability as a number (so compute capability 3.5
would be 35 and compute capability 8.0 would be 80).
As with any GPU request, you’ll need to specify the amount of GPUs you want
with --gpus=N as well.
For example, specifying --gpus=1 and --gres=min-cuda-cc:80 would give
you a single GPU with minimum compute capabilty support of 8.0.
Only one --gres option can be given, so combine them with a comma
like --gres=min-vram:40g,min-cuda-cc:80.
See the available GPUs reference for more information on available GPUs.
Reserving a GPU from the debug queue
There is a gpu-debug-partition that you can use to run short jobs
(30 minutes or less) for quick tests and debugging. Use
--partition=gpu-debug to ask for a GPU from this partition.
Running an example program that utilizes GPU
The scripts you need for the following exercises can be found in our
hpc-examples, which
we discussed in Using the cluster from a command line (section
Copy your code to the cluster).
You can clone the repository by running
git clone https://github.com/AaltoSciComp/hpc-examples.git. Doing this
creates you a local copy of the repository in your current working
directory. This repository will be used for most of the tutorial exercises.
For this example, let’s consider
pi-gpu.cu
in the slurm-folder.
It estimates pi with Monte Carlo methods and can utilize a GPU for calculating
the trials.
The script is in the slurm-folder. This example is written in C++ and CUDA.
Thus it needs to be compiled before it can be run.
To compile CUDA-based code for GPUs, lets load a cuda-module and
a newer compiler:
module load triton/2024.1-gcc gcc/12.3.0 cuda/12.2.1
Now we should have a compiler and a CUDA toolkit loaded. After this we can compile the code with:
nvcc -arch=sm_60 -gencode=arch=compute_60,code=sm_60 -gencode=arch=compute_70,code=sm_70 -gencode=arch=compute_80,code=sm_80 -gencode=arch=compute_90,code=sm_90 -o pi-gpu slurm/pi-gpu.cu
This monstrosity of a command is written like this because we want our code to be able run on multiple different GPU architectures. For more information, see section on setting compilation flags for GPU architectures.
Now we can run the program using srun:
srun --time=00:10:00 --mem=500M --gpus=1 ./pi-gpu 1000000
This worked because we had the correct modules already loaded. Using a slurm script setting the requirements and loading the correct modules becomes easier:
#!/bin/bash
#SBATCH --time=00:10:00
#SBATCH --mem=500M
#SBATCH --output=pi-gpu.out
#SBATCH --gpus=1

module load triton/2024.1-gcc cuda/12.2.1
./pi-gpu 1000000
Note
If you encounter problems with CUDA libraries, see the section on missing CUDA libraries.
Monitoring efficient use of GPUs
When running a GPU job, you should check that the GPU is being fully utilized.
When your job has started, you can ssh to the node and run
nvidia-smi. It should be close to 100%.
Once the job has finished, you can use slurm history to obtain the
jobID and run:
$ module load seff-gpu
$ seff JOBID
seff 5817422
Job ID: 5817422
Cluster: triton
User/Group: tuomiss1/tuomiss1
State: COMPLETED (exit code 0)
Nodes: 1
Cores per node: 2
CPU Utilized: 00:08:25
CPU Efficiency: 63.28% of 00:13:18 core-walltime
Job Wall-clock time: 00:06:39
Memory Utilized: 2.10 GB
Memory Efficiency: 26.31% of 8.00 GB
GPUs reserved: v100 (x1)
GPU Utilized: 10%
GPU VRAM Utilized: 15114 MB
Alternatively, you can run:
$ sacct -j JOBID -o TRESUsageInAve -p
cpu=00:08:24,energy=95240,fs/disk=147861134,gres/gpumem=15114M,gres/gpuutil=10,mem=2207116K,pages=3473,vmem=0|
This shows the GPU utilization.
In the example, you can see that the GPU utilization is low.
If this is the case you should check whether job’s CPU utilization is close
to 100% with seff JOBID. Having a high CPU utilization and a low GPU
utilization can indicate that the CPUs are trying to keep the GPU occupied
with calculations, but the workload is too much for the CPUs and thus GPUs
are not constantly working.
Increasing the number of CPUs you request can help, especially in tasks that involve data loading or preprocessing, but your program must know how to utilize the CPUs.
However, you shouldn’t request too many CPUs: There wouldn’t be enough CPUs for everyone to use the GPUs and they would go to waste (all of our nodes have 4-12 CPUs for each GPU).
Special cases and common pitfalls
CUDA libraries not found
If you ever get libcuda.so.1: cannot open shared object file: No such
file or directory, this means you are attempting to use a CUDA
program on a node without a GPU. This especially happens if you try
to test a GPU code on the login node.
Another problem that might occur is when a program will try to use pre-compiled kernels, but the corresponding CUDA toolkit is not available.
This might happen in you have used a cuda-module to compile
the code and it is not loaded when you try to run the code.
If you’re using Python, see the section on CUDA libraries and Python.
CUDA libraries and Python deep learning frameworks

CUDA toolkit is usually installed separately to CUDA drivers
When using a Python deep learning frameworks such as Tensorflow or PyTorch you usually need to create a conda environment that contains both the framework and CUDA framework that the framework needs.
We recommend that you either use our centrally installed module that contains both frameworks (more info here) or install your own using environment using instructions presented here. These instructions make certain that the installed framework has a corresponding CUDA toolkit available. See the application list for more details on specific frameworks.
Please note that pre-installed software either has CUDA already present or it loads the needed modules. Thus you do not need to explicitly load CUDA from the module system when loading these.
There is also a Pytorch module scicomp-pytorch-env/2026.1 that
contains the latest version of Pytorch and the corresponding CUDA toolkit.
This module is optimized for newer GPUs (B300s) but does not work on
older GPUs (V100s) due to differences in CUDA compute capability
requirements and supported GPU architectures.
Setting CUDA architecture flags when compiling GPU codes
Many GPU codes come with precompiled kernels, but in some cases you might need to compile your own kernels. When this is the case you’ll want to give the compiler flags that make it possible to run the code on multiple different GPU architectures.
For GPUs in Triton these flags are:
-arch=sm_60 -gencode=arch=compute_60,code=sm_60 -gencode=arch=compute_70,code=sm_70 -gencode=arch=compute_80,code=sm_80 -gencode=arch=compute_90,code=sm_90
Here architectures (compute_XX/sm_XX) number 60, 70, 80 and 90
correspond to GPU cards P100, V100, A100 and H100/H200 respectively.
For more information, you can check this excellent article or CUDA documentation on the subject.
Keeping GPUs occupied when doing deep learning
Many problems such as deep learning training are data-hungry. If you are loading large amounts of data you should make certain that the data loading is done in an efficient manner or the GPU will not be fully utilized.
All deep learning frameworks have their own guides on how to optimize the data loading, but they all are some variation of:
Store your data in multiple big files.
Create code that loads data from these big files.
Run optional pre-processing functions on the data.
Create a batch of data out of individual data samples.
Tasks 2 and 3 are usually parallelized across multiple CPUs. Using pipelines such as these can dramatically speed up the training procedure.
If your data consists of individual files that are not too big,
it is a good idea to have the data stored in one file, which is then
copied to nodes ramdisk /dev/shm or temporary disk /tmp.
Avoiding small files is in general a good rule to follow. Please refer to the small files page for more detailed information.
If your data is too big to fit in the disk, we recommend that you contact us for efficient data handling models.
For more information on suggested data loading procedures for different frameworks, see Tensorflow’s and PyTorch’s guides on efficient data loading.
Profiling GPU usage with Profilers
For optimizing and analyzing the performance of applications running on GPUs, there are several powerful tools available.
NVIDIA provides profiling tools such as Nsight Systems and Nsight Compute, which are essential for understanding GPU resource utilization and identifying bottlenecks in code.
Additionally, PyTorch offers its own set of profilers, like torch.profiler, which allows users to monitor CPU, GPU, and memory usage in PyTorch-based applications.
For a detailed introduction to both Torch and NVIDIA profilers, please refer to GPU profiling section GPU profiling.
Available GPUs and architectures
GPU brand name |
GPU name in Slurm ( |
VRAM GB ( |
CUDA compute capability ( |
total amount |
nodes |
GPUs per node |
Compute threads per GPU |
Slurm partition ( |
|---|---|---|---|---|---|---|---|---|
NVIDIA B300(*) |
|
|
10.3 ( |
16 |
gpu[64-65] |
8 |
18944 |
|
NVIDIA H200(*) |
|
|
9.0 ( |
112 |
gpu[50-63] |
8 |
16896 |
|
NVIDIA H200(**) |
|
|
9.0 ( |
12 |
gpu[49] |
12 |
6336 |
|
NVIDIA Grace-H200(+) |
|
|
9.0 ( |
4 |
gpuarm[1-2] |
2 |
16896 |
|
NVIDIA H100 |
|
|
9.0 ( |
16 |
gpu[45-48] |
4 |
16896 |
|
NVIDIA A100 |
|
|
8.0 ( |
56 |
gpu[11-17,38-44] |
4 |
7936 |
|
NVIDIA V100 |
|
|
7.0 ( |
40 |
gpu[28-37] |
4 |
5120 |
|
NVIDIA V100 |
|
|
7.0 ( |
40 |
gpu[1-10] |
4 |
5120 |
|
NVIDIA V100 |
|
|
7.0 ( |
32 |
dgx[3,5-7] |
8 |
5120 |
|
NVIDIA V100 |
|
|
7.0 ( |
176 |
dgx[1-2,8-27] |
8 |
5120 |
|
AMD MI210 |
|
|
2 |
gpuamd[1] |
2 |
7680 |
|
|
AMD MI100 |
|
|
1 |
gpuamd[1] |
1 |
6656 |
|
Since 2025, the main way to request certain types of GPUs is with
--gres, for example --gpus=1 --gres=min-vram:32. Only one
--gres option is allowed, so to combine gres, use a comma
separated list: --gres=gpu-vram:32g,min-cuda-cc:80.
Running CPU-only workloads on GPU partitions is not permitted.
If you encounter an error along the lines of
srun: error: Unable to allocate resources: Job violates accounting/QOS policy
(job submit limit, user's size and/or time limits)
, one possible
cause is that you request a GPU partition but script is missing --gpus=n.
(*) These GPUs have a priority queue for the Ellis project, since they were procured for this project. Any job submitted to the short queue might be preempted if a job requiring the resources comes in from the Ellis queue.
(**) These GPUs are split from a single GPU with NVIDIA’s Multi-Instance GPU-feature.
(+) These computers have the Nvidia Grace CPU, an ARM based cpu. Normal software compiled for x86 does not run on these nodes. See Grace Hopper Super Chips.
Exercises
The scripts you need for the following exercises can be found in our
hpc-examples, which
we discussed in Using the cluster from a command line (section
Copy your code to the cluster).
You can clone the repository by running
git clone https://github.com/AaltoSciComp/hpc-examples.git. Doing this
creates you a local copy of the repository in your current working
directory. This repository will be used for most of the tutorial exercises.
GPU 1: Test nvidia-smi
Run nvidia-smi on a GPU node with srun. Use slurm history
to check which GPU node you ended up on.
GPU 2: Running the example
Run the example given above with larger number of trials
(10000000000 or \(10^{10}\)).
Try using sbatch and Slurm script as well.
GPU 3: Run the script and do basic profiling with nsys (nsight system)
nsys is part of NVIDIA’s profiling tools and it can be
used to monitor which parts of the GPU code use up most time.
Run the previous program with nsys profile command and add --stats true flag.
Solution
With srun you can run the profiling as follows:
srun --time=00:10:00 --mem=500M --gpus=1 nsys profile --stats true -o my_report ./pi-gpu 10000000000
You should see output similar to ones shown in the section GPU profiling.
GPU 4: Your program
Think of your program. Do you think it can utilize GPUs?
If you do not know, you can check the program’s documentation for words such as:
GPU
CUDA
ROCm
OpenMP offloading
OpenACC
OpenCL
…
See also
If you aren’t fully sure of how to scale up, contact us Research Software Engineers early.
What’s next?
You have now seen the basics - but applying these in practice is still a difficult challenge! There is plenty to figure out while combining your own software, the Linux environment, and Slurm.
Your time is the most valuable thing you have. If you aren’t fully sure of how to use the tools, it is much better to ask that struggle forever. Contact us the Research Software Engineers early - for example in our daily garage, and we can help you get set up well. Then, you can continue your learning while your projects are progressing.